Grilling
To upgrade your outdoor cooking skills with grilling, the solution lies in building a campfire-style grill or using a portable charcoal grill.
This section of “Grilling” in “12 Ways to Cook in Your Backyard Without a Kitchen” introduces these two sub-sections that will help you add smoky flavors to your food in a rustic or modern way.
Build A Campfire-Style Grill
Grilling in the style of a campfire? It’s easy! Here’s your three-step guide:
- Find a clear area. Make sure there’s no flammable material nearby.
- Arrange rocks into a circle or square. The size depends on how many people you’re feeding.
- Place a metal grate over the rocks. Pick a cast iron one to withstand high heat longer.
Safety first! Keep an eye on the fire until it dies down completely.
Don’t miss out on a mouthwatering experience. Follow these steps and you’ll be cooking up delicious treats in no time!
And, don’t forget your portable charcoal grill for your next cookout!
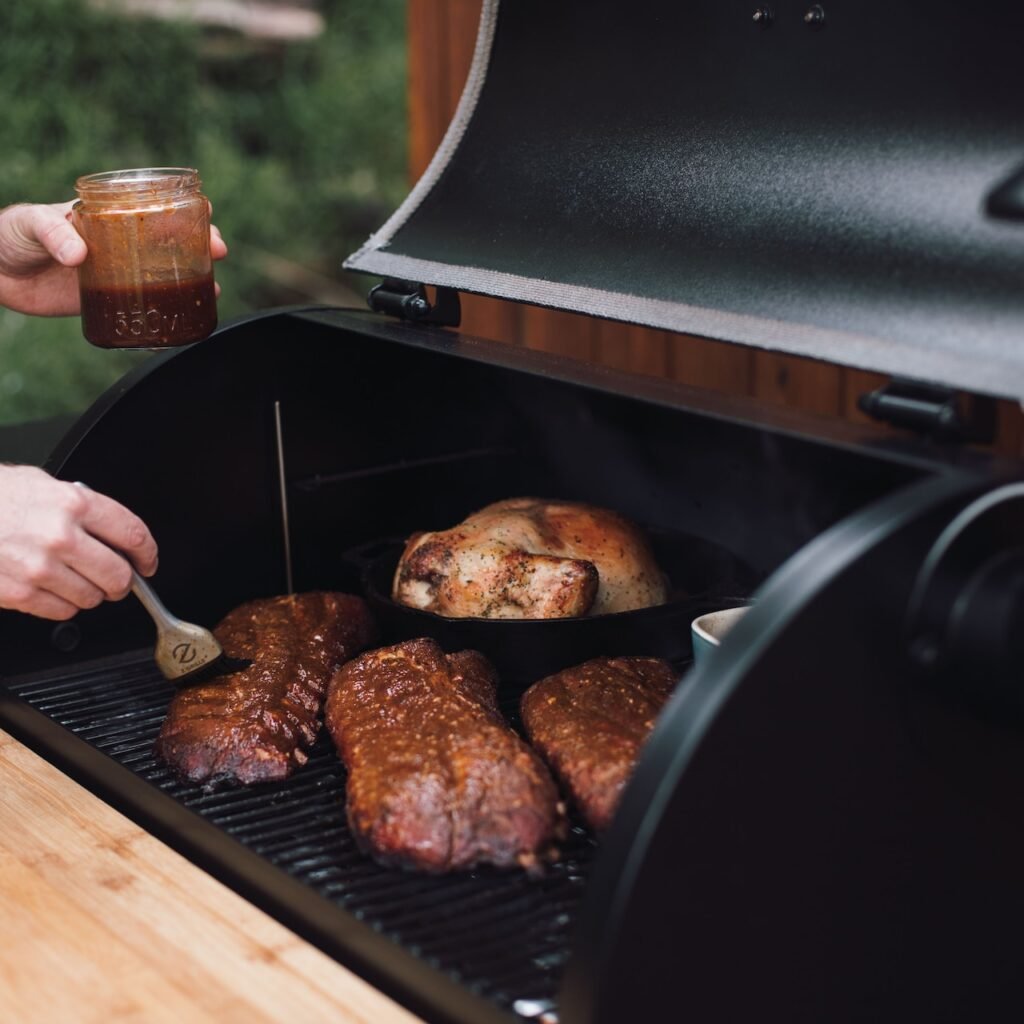
Use A Portable Charcoal Grill
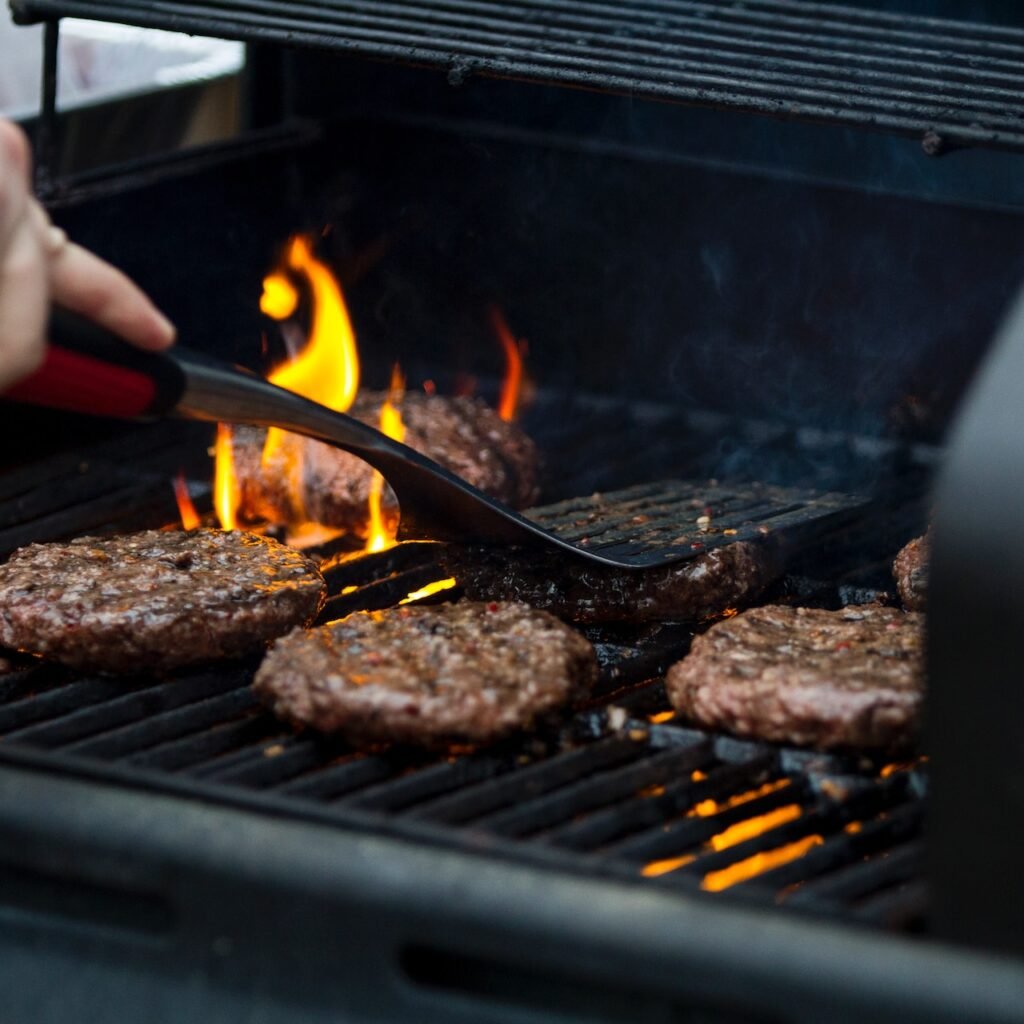
For an unforgettable grilling experience, why not try a mighty and portable charcoal grill? Here are some steps to get you started:
- Pick a flat surface away from flammable objects.
- Fill the charcoal chimney starter with charcoal and light it up until the coals turn grey.
- Spread out the hot coals on the grill’s bottom grate. Let them heat for 10-15 minutes before cooking.
- Clean up after cooking by removing ash from the bottom tray. Scrape off gunk from the top grate with a wire brush, then store it away.
Extra tips: Use wood chunks or chips for smoke flavor. Don’t peek too much when grilling – this will release heat and extend the cooking time.
Did you know that Americans celebrate National Barbecue Day on July 4th?
Grilling is so popular that over 200 million Americans own a grill!
Dutch Oven cooking is a great way to put your heavy cast iron skillet to work – plus, it’s an excuse to skip arm day at the gym.
Dutch Oven Cooking
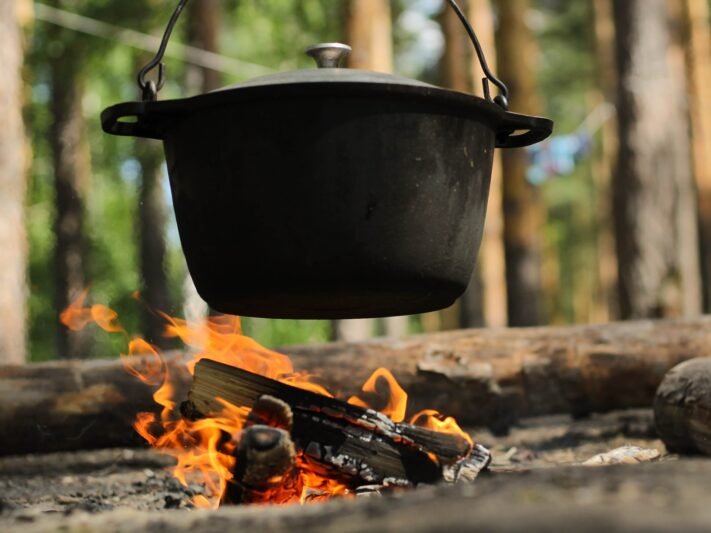
To hone your Dutch oven cooking skills without a kitchen, it’s a great idea to experiment with different recipes outdoors.
Make stews and soups or bake bread and desserts with your Dutch oven for an ‘off the grid’ cooking experience.
Discover the versatile options and learn the cooking techniques that will impress your friends and family with this section on Dutch Oven Cooking.
Make Stews And Soups
Ready to craft hearty meals with a Dutch oven?
Try making yummy stews and soups! All you need are the right ingredients, some patience, and you’ll cook them to perfection.
Follow these 5 steps for deliciousness:
- Heat oil in the Dutch oven on medium heat.
- Cook onions & garlic till soft.
- Add meat & veggies to brown. Then pour in liquids like broth or water.
- Add seasonings & spices. Put the lid on. Let it simmer for an hour or more.
- Serve hot with bread & enjoy!
Low and slow cooking is key! Allow time to simmer so flavors blend, giving you a richer taste. Pro Tip: Get a Dutch oven with great heat retention for optimal results.
And don’t forget – you can even bake bread & desserts!
Bake Bread And Desserts
Unlock the power of your Dutch oven and discover recipes that show off its special cooking abilities! Bake fluffy bread with a crunchy outside and soft center – either on a stove or over hot coals.
Make cakes, cobblers, and pies in your Dutch oven – perfect for outdoor feasts and camping trips. Play with temperatures and cooking times to get different textures.
Also, use it for slow-cooking stews and other savory dishes.
Remember to season the iron surface to avoid sticking! Plus, adding parchment paper helps reduce mess.
Pro Tip: Preheat the pot before adding ingredients – this will give you evenly cooked desserts and bread with no raw centers.
Get creative and cook up a storm with foil packet cooking!
Foil Packet Cooking
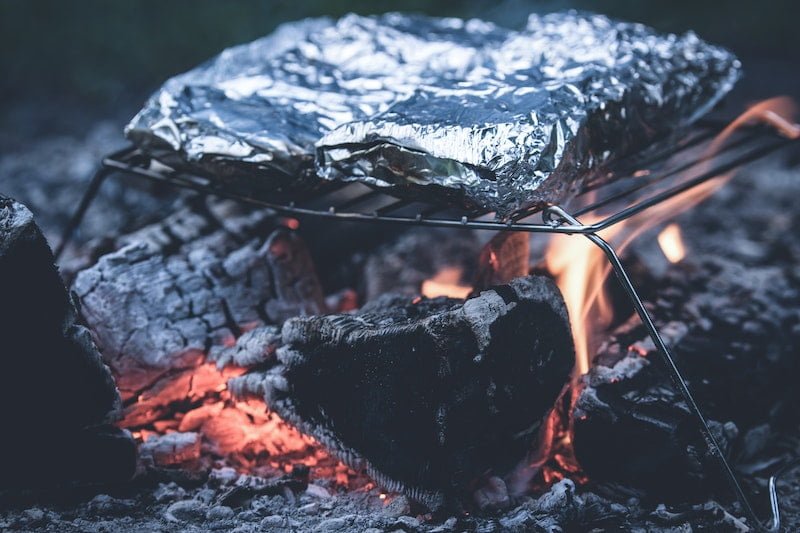
To cook delicious food without kitchen equipment, ‘Foil Packet Cooking’ with the sub-sections ‘Seal food in foil packets’ and ‘Grill or bake them in the fire’ is an ideal solution.
This method is perfect for outdoor cooking and camping and guarantees a tasty meal with ease.
Seal The Food In Foil Packets
Making food packets with aluminum foil is a great cooking style!
We can call it “packing edibles in tin-foiled pockets“. This technique keeps the juices and flavors inside, creating a tasty meal.
To do this, just follow these 4 steps:
- Cut a foil sheet according to the size of the ingredients.
- Put the ingredients in the center of the foil piece.
- Fold up the edges tightly around the ingredients to make a pocket.
- Crimp it closed and cook it on a grill or campfire, or bake it in an oven.
This way of cooking has many advantages. It’s even and clean. Plus, it works with various kinds of foods like veggies, fish, and meat.
Foil packet cooking dates back to long ago. People in the Mediterranean and the Middle East used parchment packages for cooked food. Later, it spread further north in Roman Empire times.
So why bother with a fancy kitchen when you can just wrap your food in foil and throw it in the fire?
It’s like camping but without the icky public bathrooms.
Grill Or Bake Them In The Fire
Experience the unparalleled outdoor cooking method of ‘cooking in the flames’!
Here are 4 easy steps to cook your meal in a foil packet on the grill or on the fire:
- Preheat your grill or start a fire with hot coals.
- Pack your ingredients into a foil packet. Leave enough space for steam to circulate.
- Place the packet directly on hot coals or on the grill. Cook until golden brown and crispy.
- Carefully remove and enjoy! Be careful when opening – steam may escape!
This style of cooking offers fuss-free cleanup and delicious flavor. Get creative with ingredients and seasonings for unique taste combinations.
Remember: avoid overcrowding your foil packets as they will take longer to cook.
Try this innovative outdoor cooking method for a tasty meal every time!
Mason Jar Meals
To prepare nutritious and tasty meals without a traditional kitchen in your backyard, consider exploring the technique of “Mason Jar Meals.”
Using this approach, you can layer the ingredients in a jar and cook using boiling water or a solar oven.
This section will cover the sub-sections of layering techniques and cooking methods for creating delicious meals easily in your backyard.
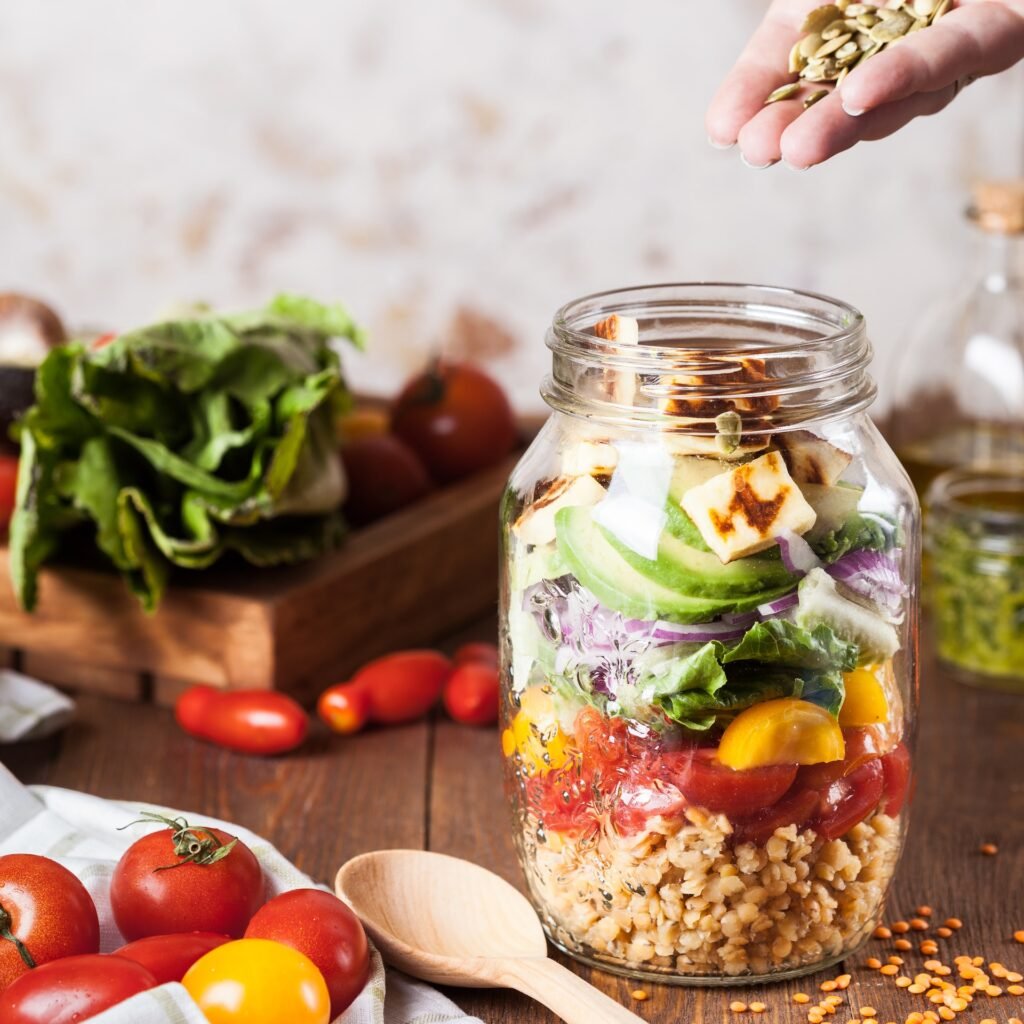
Layer Ingredients In A Jar
Layering in a jar? Perfection can be achieved with precision and the right balance of flavors.
Here’s a guide to help you create the perfect Mason jar meal.
- Start with the dressing: Pour some in the bottom.
- Grains or pasta? Layer cooked ones for texture and substance.
- Veggies, meats, and toppings? Top it off with your favorites.
Smaller jars for portion control. Larger jars for fuller meals. Experiment with flavor combinations ’til you get it just right. Happy layering!
Survivalist vibes? Cook it in boiling water or a solar oven. But don’t get them mixed up.
Cook In Boiling Water Or A Solar Oven
Cooking mason jar meals is easy and healthy. You can do it by either boiling water or using a solar oven.
- Boil: Put the jar and ingredients in a pot of boiling water. Simmer until cooked.
- Solar oven: Put the jar on a dish or rack in the oven and let it cook for several hours in the sun.
Remember, some ingredients need to be pre-cooked.
Canning jars are the safest for cooking. Enjoy tasty, eco-friendly meals with all the right precautions.
My friend uses this method to meal-prep her lunches. She loves it!
Let your inner master chef shine through with just a mason jar and some skewers.
Skewer Cooking
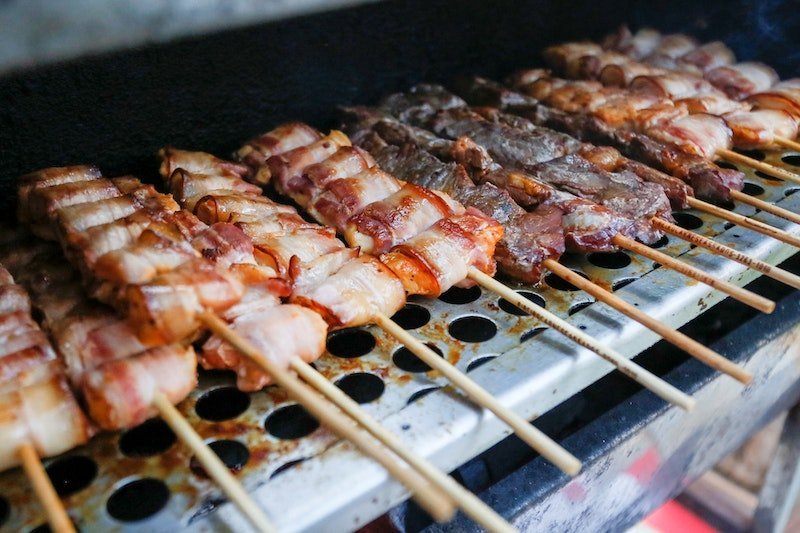
To cook delicious and healthy food in your backyard without a kitchen, turn to skewer cooking!
With threaded meat and veggies onto skewers and grilling over an open flame, this cooking technique yields great results.
In this section, we’ll explore the art of skewer cooking and its sub-sections that can help you master this style of outdoor cooking.
Thread Meat And Veggies Onto Skewers
Skewer cooking is a popular way to prepare meat and veggies!
Thread various meats and veggies onto skewers for delicious and visually pleasing dishes.
Follow these 4 steps for success:
- Choose ingredients based on texture, size, and cooking time.
- Cut meats and veggies into bite-sized pieces, then thread them onto skewers.
- Alternate meats and veggies for even flavor distribution. Leave space between pieces for even cooking.
- Grill or roast skewers until tender, juicy, and cooked through. Serve hot with sauces or sides.
Check the doneness of the meat by pressing the thickest part with a fork or knife.
If no pink interior, it’s safe to eat!
Marinate meats beforehand or season with spices for extra flavor. Experiment with bell peppers, onions, mushroom caps, and zucchini.
Don’t miss out! Skewer cooking is a versatile technique to use year-round. Gather your favorite ingredients, heat up the grill (or an open flame!), and enjoy some tasty skewers!
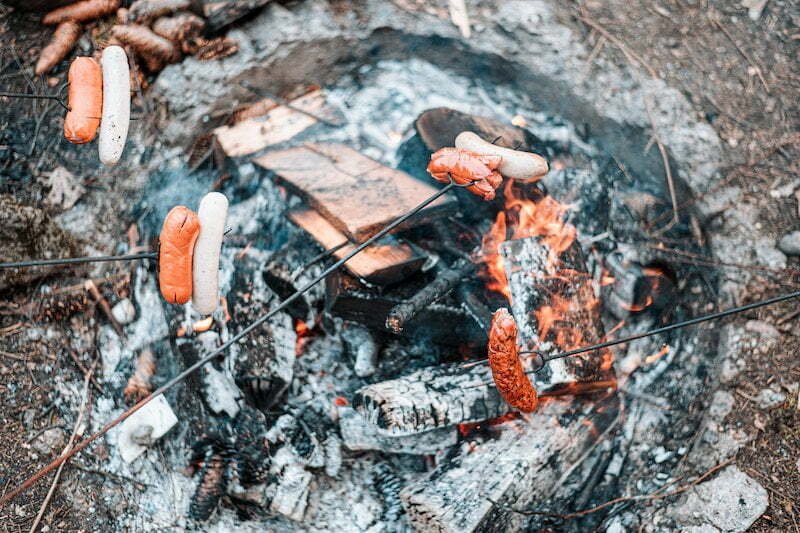
Grill Over An Open Flame
Grilling over flames is a classic way to add smoky flavor and enrich food.
To do this, you need a firepit or grill with an open heat source.
Here’s a 5-step guide:
- Light up your charcoal or wood.
- Wait for the flames to die down to glowing coals.
- Put skewers on the grill, turning them regularly.
- Baste with sauces or oil.
- Cook until meat is no longer pink or veggies are tender.
Try marinades or spice rubs to add a unique flavor. Cooking time varies depending on the ingredients and the thickness of the slices.
Fact: Skewer cooking is ancient, hunters used to impale their catch on sticks and roast over fires.
Want to go green while enjoying good food? Try solar cooking.
Solar Cooking

To cook outdoors without a kitchen, solar cooking with the power of the sun is a great solution.
In this section of “12 Ways to Cook in Your Backyard Without a Kitchen,” you can learn two methods for cooking with solar energy: using a solar oven or cooking directly with the sun’s power.
Use A Solar Oven
Harnessing the power of the sun to cook is getting more popular for sustainable living.
Solar ovens are the perfect eco-friendly and affordable way to have a Top Chef challenge in your own backyard. Here’s how you do it:
- Set up the oven in a sunny spot
- Preheat for 20-30 minutes
- Put your food in and cover
- Adjust the oven to follow the sun
- Cook until done
Solar ovens can cook the same things as regular ovens, like veggies and meat. Have a thermometer handy to check the food is cooked properly and safe. No stove is necessary!
Cook With The Power Of The Sun
Harness the Power of the Sun to Make Delicious Dishes!
Cooking with solar energy is an innovative and sustainable way to make delicious meals without any carbon footprint. Here are the five steps for harnessing the power of the sun:
- Choose a sunny spot to place your solar cooker. Make sure it gets direct sunlight.
- Prepare your food like you would in a normal cooker. Use lids and dark-colored pots and utensils for the best results.
- Position your food inside the cooker and close the lid. Align it as the instructions say.
- Wait for 1-2 hours. The time will depend on what you’re cooking and how much.
- You are ready to enjoy your zero-carbon meal!
Solar cookers can be basic models made of cardboard boxes or tin foil, or advanced versions with built-in thermometers and heat reflectors. Give this eco-friendly cooking a go – you won’t regret it!
Picture yourself at the beach while your pickled vegetables cook in your solar oven – it’s a dream come true! Or make a delicious pizza in a classic brick oven – just don’t forget your sunscreen while you wait!
Brick Oven Cooking
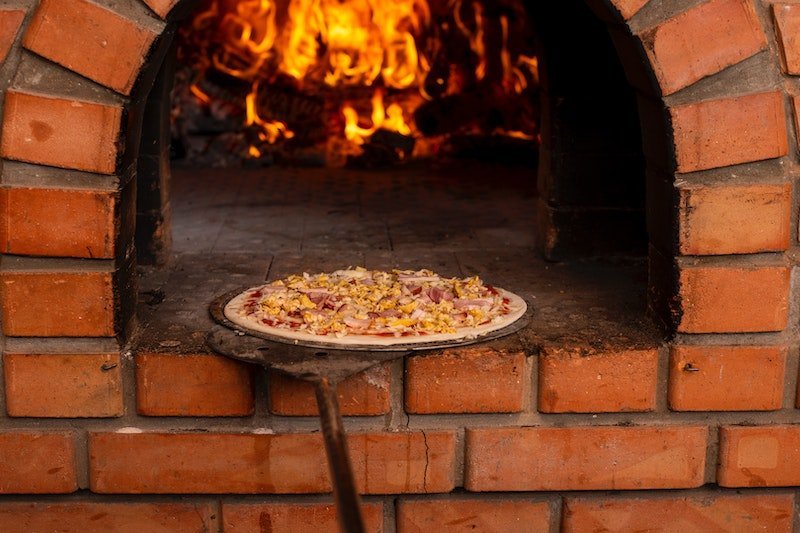
To cook delicious meals using a traditional cooking technique, embrace brick oven cooking with the help of the “12 Ways to Cook in Your Backyard Without a Kitchen” guide.
Build a brick oven or purchase a portable one, then you can cook pizza, bread, and other foods inside the oven.
Build A Brick Oven Or Purchase A Portable One
Achieving the perfect brick oven-cooked food is a choice between building a brick oven or buying a portable one. This decision requires careful consideration of your culinary needs, preferences, budget, and space.
Here’s a table with facts about the two options:
| Option | Cost | Cooking Time | Space Needed |
|---|---|---|---|
| Brick Oven | Expensive | Longer | More Space |
| Portable Oven | Affordable | Shorter | Less Space |
Building a brick oven can be costly, but it’s more cost-effective in the long run. It also takes up more space than a portable oven. On the other hand, a portable oven is cheaper and requires less space.
If you don’t have much space, go for a portable oven. If you plan to cook often and have enough funds, a brick oven is the way to go!
Enjoy heavenly brick oven-cooked goodness. Goodbye soggy pizza crust!
Cook Pizza, Bread, And Other Foods Inside The Oven
Crave something different? Brick oven cooking is the way to go!
Savour fresh, crunchy pizza and freshly-baked bread straight from the oven. This ancient technique produces amazing flavors with conductive heat from bricks.
Here’s how to cook Pizza, bread, and other foods:
- Turn up the heat for an hour or two.
- Put firewood in the oven and wait for it to become embers.
- Clean the oven with water, no soot allowed!
- Use a wooden peel to slide your food onto the surface.
- Watch your food, turn it for even baking.
- Yum, time to eat!
Switch it up by adding meats or veggies as toppings. But, no soap! It will absorb into the porous surface.
Pro Tip: Patience is key. It takes time to heat up and even longer to bake properly.
Enjoy traditional cooking and indulge in dishes not easily made by modern appliances!
Fire Pit Cooking
To cook delicious BBQ meals in your backyard without a kitchen, try fire pit cooking with a built-in grate or cast iron cookware. Both methods offer unique benefits to cooking over an open flame.
With the built-in grate, you can easily adjust the temperature, while using cast iron cookware gives you a smoky flavor and an opportunity to try new recipes.
Use A Fire Pit With A Built-In Grate
Fire up your culinary creativity with a built-in grate fire pit! Here’s how to make the most of it:
- Grill meats and veggies easily due to even heat distribution.
- Use heavy-duty cast iron cookware for an outdoor taste.
- High-sided pans stop splashes on embers, cutting down on clean-up.
- Flip food once to avoid sticking and boost flavors.
- Allow enough space between items for even cooking.
For added fun, throw in different wood chips to give dishes a unique smoked flavor.
Take your fire pit cooking to the next level with homemade s’mores or chocolate fondue! Enjoy your caveman-style cooking!
Cook Meals Over The Fire With Cast Iron Cookware
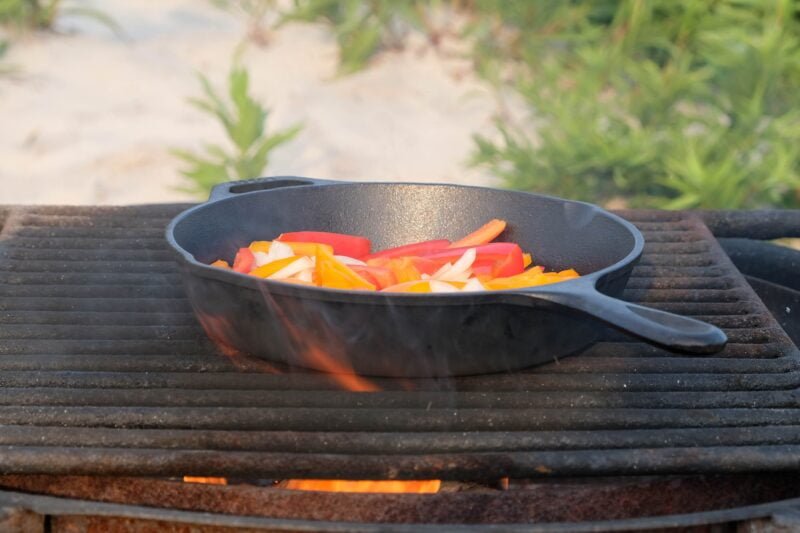
Try your hand at outdoor cooking with cast iron cookware! It’ll help you prepare tastier and healthier meals.
The smoky flavor from the fire will add to the aroma and taste.
Here’s a guide on how it’s done:
- Pick the right size and type of pot or pan for your dish. Cast iron is durable and heats up evenly.
- Season your skillet before using it. Preheat it over a fire and grease it with oil to avoid sticking.
- Add ingredients one by one, starting with those that take longer to cook. Don’t overcrowd the skillet – it’ll slow down the cooking.
- Stir often and use tongs or spatulas designed for cast iron cookware.
- Once cooked, take it off the heat and let it cool. You can make stews, soups, roasted potatoes, or even desserts like apple pie!
Sprinkle wood chips or herbs like rosemary or thyme onto the coals to infuse extra flavor. Cooking over an open fire requires patience and offers great results.
Quality takes time – so don’t rush it!
Fun Fact: In 2013, 689 liters of chili were made in a cast-iron pot at Terlingua International Chili Cookoff!
Now you can make delicious meals outdoors too!
Camp Stove Cooking
To cook delicious meals in your backyard without a kitchen, turn to the convenient and portable option of camp stove cooking. With the use of a portable camp stove or small propane/butane stove, you can easily whip up appetizing dishes in the great outdoors.
Discover the benefits of each of these sub-sections as you explore the world of camp stove cooking.
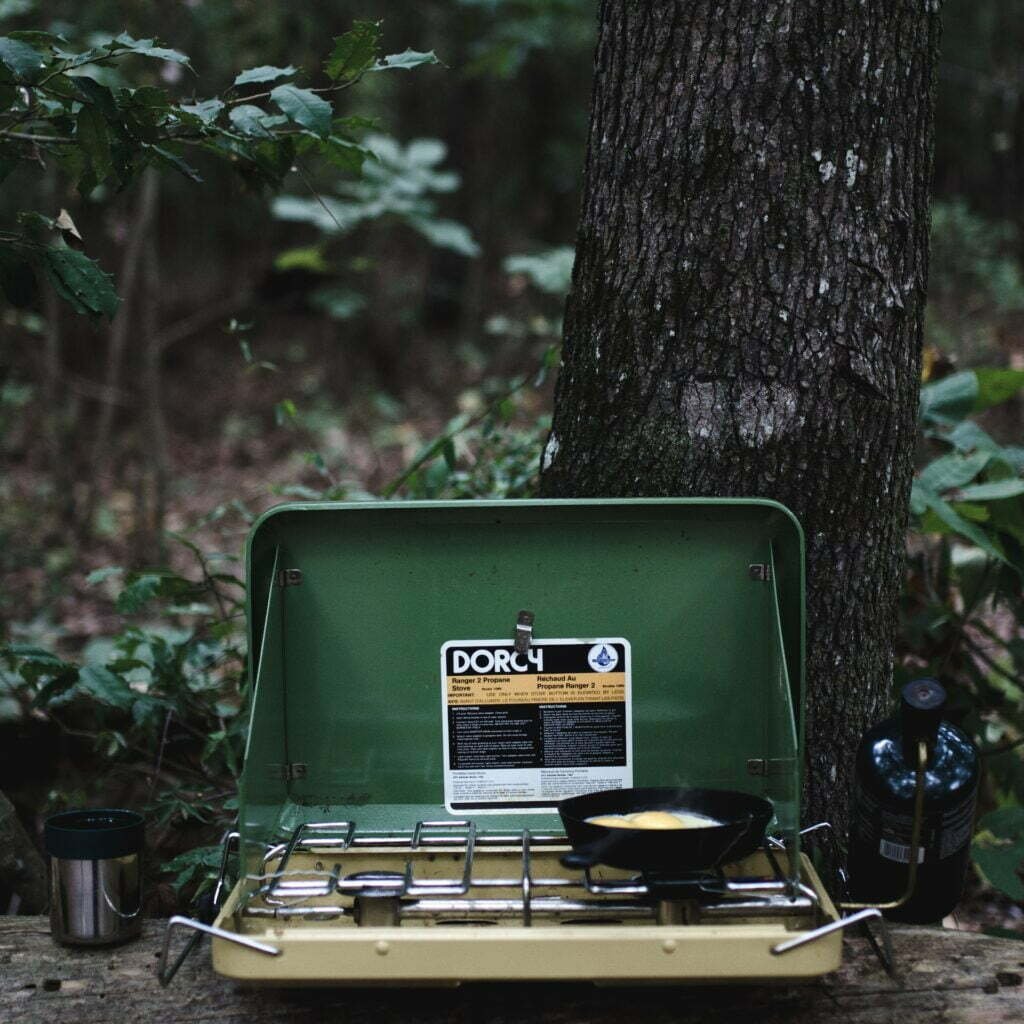
Use A Portable Camp Stove
A portable camp stove is a great camping accessory for meal prep. Open flames can be dangerous and cause fires, so a camp stove lessens the chance of accidents and makes cooking easy.
Here’s how to use one:
- Set up the stove on a flat surface away from flammable materials.
- Add fuel, either propane or butane.
- Light the flame and put the cookware on top.
Remember to follow the manufacturer’s guidelines for cleaning and maintenance. Also, take extra fuel canisters on your trip – you won’t find them in remote areas.
Did you know that kerosene powered the first camp stoves in Europe in the mid-19th century?
Now you can make gourmet meals while camping with a portable stove!
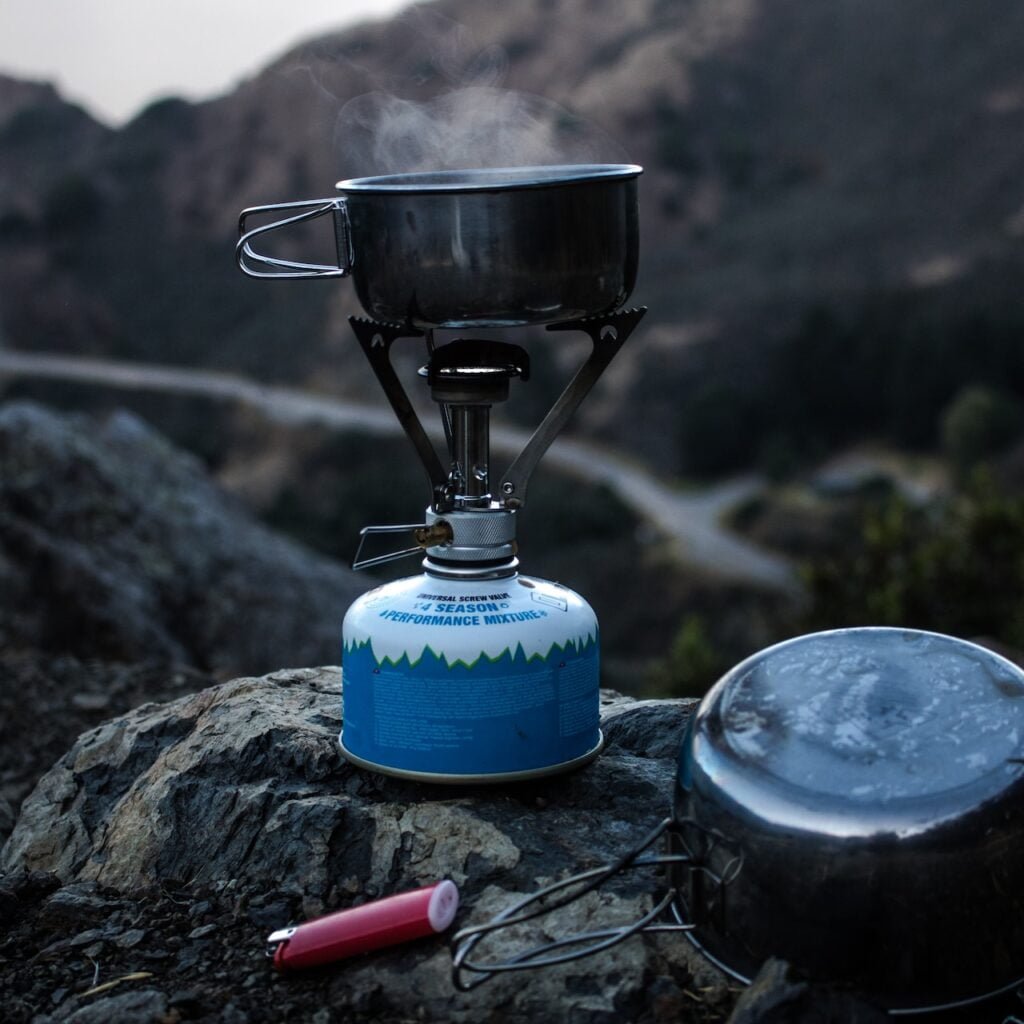
Cook Meals With A Small Propane Or Butane Stove
Exploring the great outdoors? Get a propane or butane stove! It can be used to make yummy meals in the comfort of your campsite.
Here’s a 4-step guide:
- Choose a spot with enough space and a flat surface.
- Gather ingredients and prepare them.
- Set it up according to manufacturer instructions.
- Light it up with a lighter or matchstick.
Remember: factors like fuel, wind, and others can affect cooking time and temperature.
My friends and I once cooked all our camping meals on a tiny gas grill. We weren’t used to the altitude, but eventually, we made it work. We even grilled steaks that were mouth-wateringly juicy!
Who needs a smoker when you have a camp stove?
Smoker Cooking
Smoking food is a traditional way of cooking that imparts a smoky flavor to meats and vegetables.
In this section, we will guide you through the process of building or buying a smoker, and show you how smoking can transform your outdoor meals with flavorful results.
Build Or Buy A Smoker
Smoker? Options abound! Here’s a comparison of building or buying one.
| Build | Buy |
| Customize with desired features. | Quality construction guaranteed. |
| Time and effort needed. | Instant setup. |
Creating your own smoker is a personal option. But, manufacturers make quality smokers you can buy.
For a speedy start: Use durable materials for parts. Get vents and accurate temperature sensors.
Add a smoking chamber for more cubic space. Set up ventilation for optimal smoke flow.
Now, add some smoke to your game. Enjoy meats and veggies, bursting with flavor.
Smoke Meats And Veggies For A Flavorful Meal
Smoke up your meals for an extra flavor boost! Retain natural juices and get savory dishes by smoking meats and veggies.
Here’s how:
- Add wood chips or pellets to prepare your smoker.
- Season the meat or vegetables with spices and herbs.
- Place them on a rack and let them cook.
Vary the flavors by using different types of woods, like hickory or applewood. Plus, thaw the meat completely before smoking to avoid uneven cooking.
For even tastier dishes, marinate the meats before smoking. The acidity helps break down tough fibers and absorb flavor. And don’t forget to use a dry rub for added flavor.
Follow these tips and turn any dish into a unique and delicious masterpiece!
Hobo Stove Cooking
To learn the art of hobo stove cooking with tin cans and without a proper kitchen, try these two quick sub-sections:
Create a makeshift stove out of tin cans and then heat your food over the stove using basic cooking equipment.
Create A Makeshift Stove Out Of Tin Cans
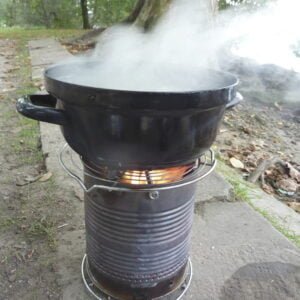
Hobo Stove Cooking is a creative way to use overlooked resources for cooking. Make a makeshift stove from two tin cans and cook outdoors or in emergencies.
Here is a 5-step guide on how to make it:
- Get two tin cans of different sizes. The large one should be 10 cm in diameter.
- Cut the top & bottom off the bigger can, leaving just the cylinder-shaped part.
- Pierce holes along the bottom edge of the smaller can using a nail or pointy object.
- Put the small can inside the bigger one. Fill with twigs, leaves, or any light fuel.
- Ignite the material inside and place your pot or pan on top to begin cooking!
Hobo stoves emit less, use less fuel, and are both portable and free. You can use this method while camping or during power outages.
Historically, hobos used tin cans to make stoves during hard times. Now, many people do this for economic or environmental reasons.
Why get an expensive stove when you can cook like a hobo and still have a hot meal?
Heat Food Over The Stove Using Basic Cooking Equipment
Ever wanted to cook tasty meals quickly while camping or during power outages? Here’s your chance!
Gather these simple materials for cooking food over a basic stove:
- Fuel – wood, charcoal, or coal
- Dry kindling
- Rocks or bricks
- Hobostove
- Oil or butter
- Pots and pans (coffee cans, soup cans, steel plates, or flat rocks)
Follow these 6-steps for a hot meal in minutes:
- Construct a small fire pit with rocks or bricks.
- Place your hobo stove on top of the fire pit.
- Heat it up until it is hot enough for cooking.
- Add some oil or butter to the pan.
- Cook your food and stir occasionally.
- Enjoy your meal!
So don’t miss out! Get your materials today and make gourmet popcorn, and more, with a campfire and a hobo stove.
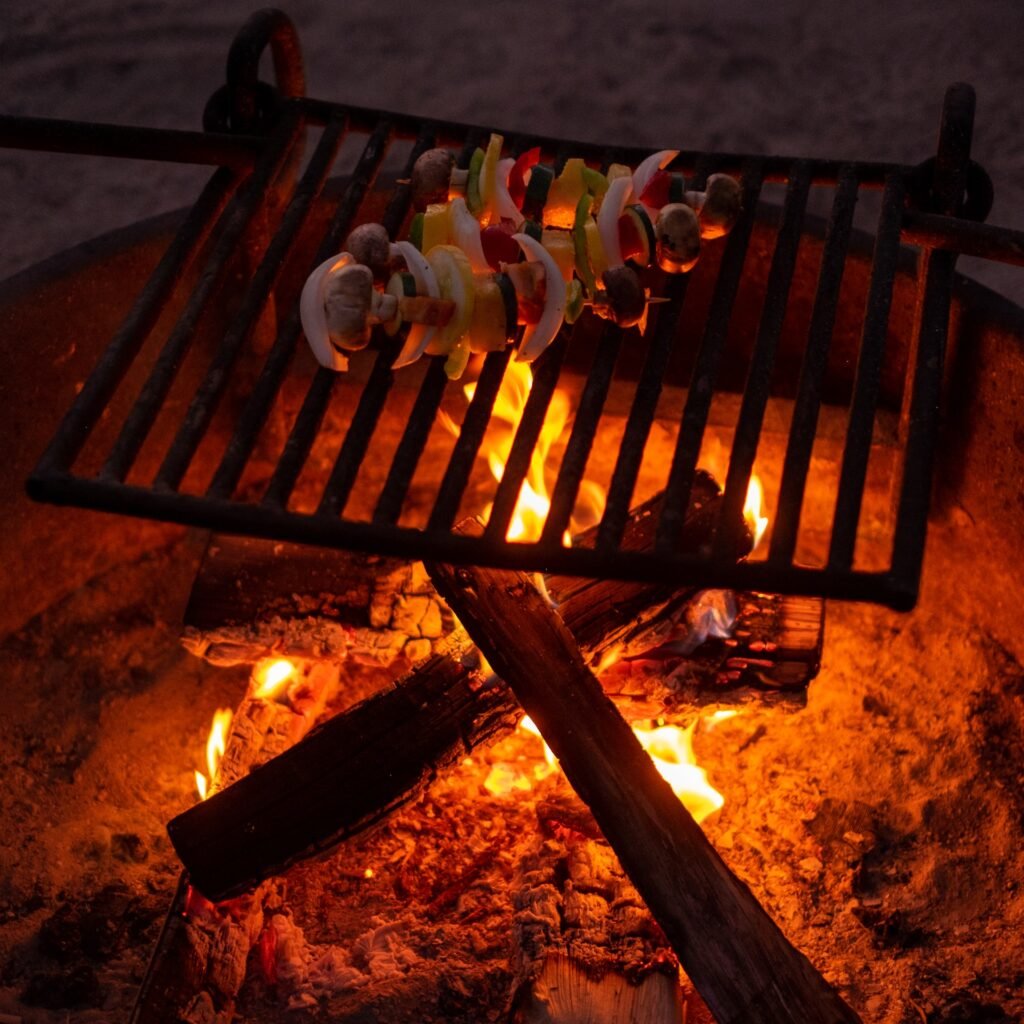
Campfire Grate

Campfire grate cooking is an old tradition that has been enjoyed by outdoor enthusiasts for generations.
Whether you’re camping in the wilderness or just in your backyard, cooking over an open flame adds an element of adventure and excitement to any meal.
The campfire grate provides a stable platform to cook on and allows you to easily control the heat of your fire, ensuring that your food is cooked to perfection.
With a little creativity, you can cook anything from hot dogs and burgers to steaks and vegetables over your campfire grate.
Plus, there’s nothing quite like the taste of food cooked over an open flame, making it a memorable experience for everyone involved.
Cooking in your backyard without a kitchen can be a fun and creative way to enjoy delicious meals while embracing the great outdoors.
With the wide variety of cooking methods and techniques available, you can whip up everything from classic grilled favorites to unique and exotic dishes that will impress your friends and family.
By using simple tools like charcoal grills, campfire grates, and portable stovetops, you can explore new culinary horizons and create lasting memories in the process.
So why not take advantage of the beautiful weather and try out some of these awesome ways to cook in your backyard today?